Need any help or advice?![]() Contact Us
Contact Us
VIDEO TUTORIAL
How to Make Complex Split/Multi-Part Mold for Composites
Follow this step by step guide to take a composite pattern and create a precise, multi-part split-mold for fiberglass/GRP/FRP/composites.
If you want to make a copy of an existing part (or original design pattern) in a composite material such as fiberglass or carbon fiber then you will need to take molds from the original part or pattern.
Sometimes, the shape of the part that you want to copy means that you can't make a simple one-piece mold and in this case you will need to make a multi-part 'split mold' which can be bolted together to lay-up the part and then unbolted and split apart to remove the part.
If you're not familiar with the techniques for making a multi-part mold then this process can be quite daunting but in this professional video tutorial we take you through the complete process, from start to finish, demonstrating the best practices for producing a multi-part split mold. In this video we create a 3-part split-mold for the airbox pattern that we made in our Composite Pattern Making Tutorial.
TUTORIAL BREAKDOWN
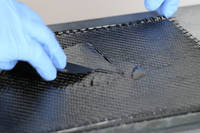
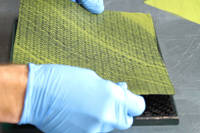
1. Hand lay-up
Two different hand-layup carbon fiber sheets are produced, one using 6 layers of 100g unidirectional carbon fiber and one using alternating layers of 210g 2/2 twill carbon fiber and 300g +/- 45° biaxial carbon fiber.
EL2 epoxy resin is wetted into the reinforcement using a laminating brush and then a layer of peel-ply is applied to the back of the sheet to allow excess resin to be squeezed from the laminate and also leave a bond-able textured finish.
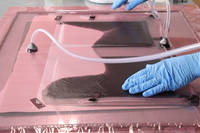
2. Resin infusion
Two different laminates are used in the resin infusion demonstration, one using the same alternating layers of 200g 2/2 twill carbon fiber and 300g +/- 45° biaxial carbon fiber that are used in the hand-layup demonstration and the other using 6 layers of 650g carbon fiber. The sheets are infused using IN2 epoxy infusion resin.
The reinforcement is covered with a layer of peel-ply which is cut over-size to create a resin break before a layer of infusion mesh is positioned directly over the reinforcement. Resin infusion spiral and resin infusion connectors are put in place before vacuum bagging tape and VB160 vacuum bagging film are used to complete the vacuum bagging stack. Vacuum is supplied by our EC.4 compact composites vacuum pump with a resin infusion catch-pot in place to eliminate the risk of resin being drawn into the vacuum pump.
3. Oven-cured prepreg layup
A single laminate sample is prepared using a layer of our old Easy-Preg out-of-autoclave surfacing prepreg top and bottom with three layers of our old 430g Vari-Preg prepreg (two of them cut on the 45° bias) making up the thickness.
These pre-pregs have been superceeded by our XPREG range of carbon fiber pre-pregs.
The layers of prepreg are consolidated using a plastic finned laminating roller before being covered in a layer of R210 unperforated FEP release film. A layer of breather cloth is positioned over the laminate and into some clear space to the side of the sheet onto which a through-bag connector is positioned (our connector is fitted with quick release vacuum couplings). The sheet is envelope bagged using VB160 vacuum bagging film and sealed with vacuum bag sealant tape.
The vacuum bagged prepreg sample is then loaded into our soon-to-be-release OV301 curing oven to cure under full vacuum for several hours.
DISCUSSION (27)
Please share any questions or comments you may have about this video tutorial.
LEAVE A COMMENT OR QUESTION
DISCUSSION (27)
Please share any questions or comments you may have about this video tutorial.
LEAVE A COMMENT OR QUESTION
100% SECURE
PAYMENT METHODS


Easy Composites Ltd, registered in England 7486797. All content copyright (C) Easy Composites Ltd, 2025. All rights reserved.